Showing posts with label recipes. Show all posts

Monday, September 30, 2013

Suppertime! Cracklins, Lard Renderin' an Cracklin Bread

cracklins
Let me just start out that cracklins are not the same thing as pork rinds city folk an' Yankees buy at the Quick Mart. Pork rinds start as little ol' pieces of pork skin that are quickly fried in hot oil to allow them to expand as they fry. They do not contain pieces of meat or fat as cracklins do. NOT the same!

Cracklins are a wonderful byproduct of renderin' lard. Folks don't just up an' make cracklins. When you butcher a hog you cut off the fat an' render it out to make lard.  
renderin' lard
As the hog is butchered, each piece of meat is cut appropriately. Hams might be rolled in a mix o' salt an' sugar an' laid on a board to be covered with the mixture to make country hams. Bacon meat from the belly area, the hams, the jowls, the hocks might be hung in a smokehouse an' hickory wood started below to smoke for days to preserve.

Small pieces of meat are cut as the process continues an' set aside for sausage. Spices will be added an' the sausage may also be hung in the smokehouse.
Smokehouse

Cracklins
As the lard renderin' process starts, a lard pot is heated up over a fire an' the pieces of hog fat are thrown into the pot. There are three kinds o' fat on a hog; Leaf lard is inside the loins of the hog an' is often processed first an' separate. It is used for bakin' an' tastes the best. Fatback is from between the skin an' muscle and caul fat is inside the belly an' around some of the organs. The fat is liquified as the pieces of fat in the pot heat up. This is stirred constantly with a long wood stir.  Sometimes folks used the same stir that they use for apple butter.
apple butter stir


As the fat was cut, pieces of skin an' meat was left on the fat. This also cooks as the lard is rendered an' becomes a treat called cracklins for them folks that take the time to constantly stir the lard. Y'all don't want the lard to scorch, do you?

The cracklins are dipped out as they begin to float. Most folks put them in a bowl or on some newspaper to cool an' drain.  Seasoned with salt an' grabbed up by the handfuls, they quick like
cracklins ready to eat
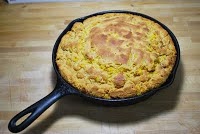
disappear. Cracklins are best when fresh out of the pot with a bit o' salt an' pepper thrown on them.

Cracklin Bread
Another treat to make with cracklins is cracklin bread!  Not just cornbread, but a rich an' wonderful treat durin' hog killin' time.
It is a simple recipe so I won't repeat the basic cornbread recipe.

cracklin bread in skillet
Heat up your cast iron skillet in the oven at 400 degrees as with regular cornbread
Mix up the cornbread recipe
Add 1 cup of fresh cracklins - chopped into small pieces.
Add a little extra buttermilk if batter is too thick
Pour into hot skillet an' bake 35 to 40 minutes

Serve with Soup Beans, onions an maybe some greens!

Saturday, September 28, 2013

Down Home Cornbread

Well, if y'all are readin' this you did what you was told an' seasoned your iron skillet. I'm right proud that you listened to good advice an' are ready for that cornbread to go with your soup beans.

If y'all used white beans, just go on to the store an' buy a corn muffin mix. There ain't no hope for you.

Start with a well seasoned iron skillet


Before you start with the cornbread recipe take a moment to oil the bottom an' side of the skillet. I use bacon grease for this. It don't take a lot but it will keep the cornbread from stickin'. I like to put my skillet in the oven to get hot. It makes the bottom an' side crust even better.

Preheat the oven to 400 degrees - when up to temperature put the skillet in to heat up

1 cup corn meal  (not cornbread mix.  You can use mix if you are in a hurry or are too sorry to make good cornbread) Folks down home use Martha White, White Lilly or their local corn meal. Just make sure it is fresh an' not sittin' around in your cupboard for a year.
1/2 teaspoon salt
1 egg (don't even think of usin' that "eggbeater" stuff!)
1 cup buttermilk (I reckon you can use sweet milk)

1/2 teaspoon bakin' soda (to help it rise)
3 Tablespoons melted bacon grease (or other shortenin'.  Oil is OK if you have no bacon grease.  But, who ever heard of mountain folks NOT havin' a little bacon grease?)

DON"T USE FLOUR IN CORNBREAD!  NO SUGAR!!!  Cornbread don't have sugar in it!!

Mix all ingredients together
Take your skillet out of the oven (with a pot holder.)
Pour ingredients into the hot skillet and place in oven
Bake at 400 degrees for 35 to 40 minutes.  The crust should be a golden brown.

Turn the cornbread out onto a plate and cut into wedges.  
Good cornbread should be a little crumbly.


Friday, September 27, 2013

Suppertime! Skillet care before you make cornbread

Well sir, I reckon I can't leave y'all hangin' since some folks are already soakin' their beans from yesterday. Folks can't have soup beans without cornbread. There are some other things we have with our soup beans like fried taters, greens with some big ol' chunks of ham and always you need some onion.


First things first! Before y'all can make cornbread you need a good skillet. Do you have a good iron skillet? Do you have one that you haven't used but was Grandma's? Is it rusty an' sort of scabby from misuse? If you don't have an iron skillet how in the world are y'all going to make cornbread?

sigh

Well, let's start with that nasty ol' skillet you have hidden away an' that you never use. Your loss, of course. Want an awesome steak? Use a skillet? The best fried chicken in the world? Iron skillet. Fried taters just don't taste like Mama used to make? I'll bet you aren't usin' Mama's skillet!

Get that nasty skillet off the shelf an' take a look. THIS IS NOT what you do for a good skillet. This is a rehab of a misused or forgotten skillet. If it is rusty an' scabby - never fear. It can be saved. Don't even think of throwin' it away.

If it is really heavily covered in the cookin' area with build up you can put it in your oven an' run the "self clean" option on your oven. This will turn that build up to a little ash and save a lot of elbow grease on your part. After the self clean - go to the next step here.

Cleanin' the nasty skillet
Note: you never use soap on a good an' well seasoned skillet - only wash with water an' let dry.

Wash the nasty skillet well with soap an' water. Scour it to get any rust an' buildup off. Use a good steel wool or metal scourin' pad - NOT one of those sorry plastic things. You need to get all the rust and build up off!

Seasoning
Let it dry well before the next step. After it is dry I personally recommend you use BACON grease to season it. This is a very important step! Rub the cookin' area well with bacon grease. If you would rather, you can use cookin' oil, but it really won't be seasoned as well as it is with bacon grease. (personal opinion)

Rub the bacon grease into the surface. I would let it set for awhile and do the same a second time.  After it is well coated with bacon grease, put it in a hot oven (400 degrees) upside down with a piece of aluminum foil under it. This keeps the grease from poolin' in the skillet and keeps the bacon grease from drippin' into your oven. Keep it in the oven for at least an hour.

This process gives your skillet a non-stick surface.  If your skillet sticks it is not seasoned properly.

Take the skillet out and let it cook before puttin' it away.

Care of a seasoned skillet
When you use your cast iron skillet you should NEVER use soap on it. Wash it with hot water and scrub it if needed. Let it dry and lightly rub a little bacon grease into the cooking surface and inside sides of the skillet before storin' for the next use.

I'll wait till y'all get that skillet in shape before I tell you how to make good ol' cornbread like we make down home.

Thursday, September 26, 2013

Suppertime - Soup Beans!

I've been workin' on a project for a while and want to begin to share a few things that will be part of the project.  It is a book and CD combination that will be called "SUPPERTIME".  It is mountain stories, reminisces and good ol' down home recipes from family and friends.  The CD won't be a fancy studio recordin', but is being recorded around the table.  I've already started the recordin''s with friends and it is goin' to be wonderful.  You can hear the clink of glasses and plates faintly as they talk.

So, for today a simple but important recipe and a lesson for city folks and Yankees.  SOUP BEANS!

Soup beans have been a staple for mountain folks for many years, cheap, easy to dry and store and
full of flavor and nutrition.  Meat was often hard to come by and fresh meat was seldom seen years ago.  Mountain families often had a hog or two roamin' the hills and during the fall they would wait for "hog killin' time" , that is to say, cool weather that would be good for butcherin' a hog without spoilage.  Soup beans with a ham hock, fatback, hog jowl (jowl bacon to some) or a big ol' ham bone made good use of the leftover parts from a meal.

In addition to addin' a little meat to the soup beans, the bone and meat will have a little fat for flavor as well as addin' salt.

Please note, and this is important; Soup Beans means only one kind of bean in the hills - PINTO BEANS!  The bean is spotted like a pinto pony and this is the REAL bean for Soup Beans.


The recipe for Soup Beans is simple!

Place your beans in a pot and wash well.  There are often little rocks in the beans, so sift through them as you wash them, also toss any nasty lookin' beans.  I don't want to eat a nasty ol' bean.

Cover the beans with plenty of water and set them aside to soak overnight.  Some folks don't do this step, but I think it makes for a better pot of soup beans.  They plump up and absorb the water.  Also, some of the natural starches leech out and makes the beans (and you) a little less gassy.

Next day pour off the water, fill the pot and put on the stove on a medium low heat.  I like to cook beans low and slow.  Add some salt and pepper.  I do this by feel, but I'd say at least a tablespoon of salt at this point and maybe a teaspoon of pepper.  You will taste it as it cooks and can add seasonin' as needed.

I add my ham at this point.  I often have a big ol' ham bone that came from a Sunday dinner or maybe Easter or Christmas.  Some folks add some bacon grease if there isn't much fat on the piece of ham or ham hocks you add.  That is up to you and you can add bacon grease at any time for flavor.

As it cooks I stir it occasionally and add water as needed.  If you soak the beans overnight you won't add as much water as they cook.  Cook the beans for all day is usually how I cook them.  I want them to be thick and not soupy/watery when I eat them.

DO NOT STIR A LOT!  Over stirrin' will break the beans up and you will have mush.

That is the basic recipe that you would find back home.  I add a little garlic and a small onion chopped well to mine.  Gives it a bit more flavor.

Now, don't forget the cornbread an' an ol' onion to go with it.  If y'all are real mountain folks you might want a big ol' cold glass of buttermilk!